i got 115 sheets of 8.5X11 blue cardstock, and folded them all in half.
 i also took 20 sheets of orange cardstock and cut 6cmX6cm squares out. (silly to use centimeters i know, but that was the size that they needed to be, otherwise it would be 2.something inches)
after getting the invitations printed, they ended up smaller than i thought.
(plan A had slightly smaller than 8.5X5.5 invitation cards) So I went back and cut a few cms off of the side of the blue cards. (I ended up liking this better, it didnt look as standard as an average half fold card, or maybe I am just telling myself I like it better, because that is how it worked out?)
I got my trusted roll of Scotch Permanent Double Sided Tape (I had tested one a few weeks earlier and it still held up) and taped the invites centered onto the bottom half of the inside of the card. 
 All it took was a few small peices of tape at the corners.
All it took was a few small peices of tape at the corners. While watching My Bestfriend's Wedding, my FMIL and I cut over a hundred ribbons to length to fit around the blue cards, and we taped them in place using more double sided tape. many of the ribbons were a bit too long (cut long on purpose), so I just trimmed them to size when taping.
 To stick the orange card onto the ribbon, I overlapped more tape on the top and bottom of the ribbon, this will help the ribbon stay strong also. (you can kind of see the tape above and below the ribbon seam, before I attatched the orange card.)
To stick the orange card onto the ribbon, I overlapped more tape on the top and bottom of the ribbon, this will help the ribbon stay strong also. (you can kind of see the tape above and below the ribbon seam, before I attatched the orange card.) I had designed 5cmX5cm squares in Word and put a text box in each one for names. This was a lot of copy/pasting then changing the names for each invited party.
I printed the pages and cut the squares out. (The actual squares were a very light ink color I just used it to help lay out the names on the page, and to help with cutting, I didn't actually want a printed square after cutting.)
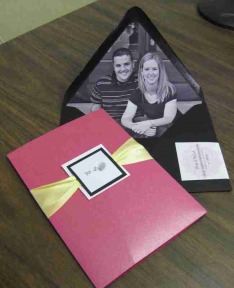
The names are the same font as used inside the invitation. I chose to use first names for most of them, and on some, they were even more personalized, for example, Aunt Sally and Uncle Jim. I put nicknames on some of them, like my friend Rachelina and her son Judebug. This may not be the most "proper" formal etiquette, but its very much "me" (for my guests), for Mikey's guests, they were mostly first names. Some guests were added after the printing was done, for them, I just cut a blank square of cardstock, and handwrote the names on it, just as an innerenvelope would be hand written.
The invitation kits that we bought didn't actually come with inner envelopes, so this was great alternative to adding an extra envelope, and it dressed up the front of the invitation. (we didn't actually use the invitation kit cards due to printing difficulties, but we used the envelopes.)
 The information card was tucked under the ribbon on the inside. I wanted this to be loose, because it includes the driving directions, so people can bring just it to the wedding if they need to. We did not use the RSVP envelopes that came in the kit because our RSVPs are online or by phone, not mailed in.
So here is the cost breakdown for your curiosity:
invite kits: 3 x 3.97 = 11.91 (all I used was the 2 kits worth of envelopes the rest of the kit will be used elsewhere though)
blue cardstock: 115 sheets at 0.09 each = 10.23
orange cardstock: 20 sheets at 0.09 each = 1.72
sheer silver ribbon: 3 x .80= 2.40
Printing at Staples 50 pages of invites+25 pages of RSVPs = $36.75
cardstock $14.99 (way more sheets than I actually used)
double sided tape: 5 rolls 11.20ish (I forget exactly the cost)
for 100 invites (includes extras) = 89.20 <$0.90 each invite. not counting postage.
The postage ended up only being $0.44 each since they were like 0.8 oz. we saved some postage by hand delivering a few. We also saved on postage by opting for phone/online rsvps.
 This is a picture of our favorite Postmaster, Ray. He's a pretty great guy. We do quite of bit of mailing with the home buisness, hes always got a smile on his face. Thanks Ray.
I didnt include the cost of the new paper cutter, I needed a new one anyway and i will use it many more times. 1 replacement blade for it is only like $2 though.
more information including inspiration here


